Tying LaFontaine's Emergent Sparkle Pupa

Tying LaFontaine's Emergent Sparkle Pupa with Thread Shredder John Wood
Materials for Tying LaFontaine's Emergent Sparkle Pupa
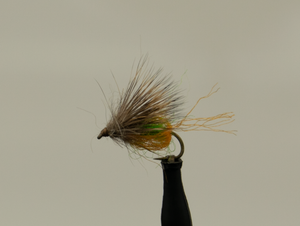
Hey everybody, this is John Wood and I'm coming to you once again from East Rosebud Fly and Tackle in beautiful Billings, Montana. In this video, I am gonna tie for you a stable pattern, it should be in everybody's box, if you're fishing in the Rocky Mountain West, and it is Gary LaFontaine's emergent spark pupa. This is a surface caddis fly that imitates the emerging adult, and it's just... It's a spectacular fly that's based on years and years of underwater research and observation by Gary LaFontaine and his team, and it comes from... It's listed in several of his books, Caddis Flies obviously, Trout Flies, Proven Patterns, and also in the Dry Fly New Angles, but if you're gonna fish Caddis hatches and you're fishing a Caddis Hatch, you can't get them to take a curtain fly like the standard elk hair caddis is probably because they're keyed in on the mergers, this fly right here is the ticket, will do it for you, so this one we're gonna tie for you today, I'm gonna tie it on a size 16 Timeco 100 hook, just your standard dry fly hook, any standard dry fly hook will do for this by the shuck on this, and the bubble is a burnt orange antron yarn, and you can see it's a pretty bright color, the body is a combination in his mixed of bright green insect Green, antron and insect green hair dubbing.
Deer hair for the wing we're gonna use, I like this dark spinning hair, now, you can see it didn't really flare 'cause I'm right out towards the ends when we tie this in, and it's gonna give me just in a flare, but not too much, and then they head on this fly, which creates that forward shroud. I have cut off hair from a hair mask, the reason I like to do this is because it lets me control the color, as you can see, the edges are really light and a center really, really dark and by using the dark and the light, and then around the back, some of this red that you can see right here, you're able to get a really, really modeled color out of that. So let's get started with started see if we can tie one up.
Watch Here on East Rosebud Fly and Tackle
Let's Start Tying
Set up your materials and tie along with Dave
Okay, so let's tie Gary LaFontaine sparkle emergent pupa. This is a caddis emerger pattern, this works really, really well in situations where they're Caddis on the water, but you can't get the trout to take a dry... I'm gonna start by putting my thread on there, I'm gonna come back and be just a little bit short of the start of the hook, man, and what I've done is I've pulled off a link of the burnt orange antron and kind of not right in the middle. To double that over and trim the ends, so that they're nice and even, I'm gonna start by bringing my thread back forward about halfway and catch one half on the back side of the hoop, and then attach the other half... Evenly that real quickly. On my side of the hook and catch it in my material clip there. Now, what this is gonna allow me to do is create that shroud that goes all the way around the body in this way... Now, I'm gonna take my thread back to the start of the bend of the hook, there a couple of ways you can tie this... Some people like to tie off the shuck first and then do the bubble around the fly, I like to come back later, and I'll show you we're gonna pick that trailing shuck out.
Now they've got my shock in place, you're gonna come up here and a little dubbing wax to my thread, I don't mean a ton, I don't need a long surface covered with it. Now, this is the two beings that I mentioned, they've been blended together and I've got them in my little make shift coming dispenser. I just find it a lot easier to use. I'm gonna pinch it out and just kinda touch it on to the thread And it's a technique that Gary called Touch Dubbing, and you just put it on there. And for this portion for the body, I do like to give it to us a little bit of a twist to kinda contain it, so it doesn't get so wild, so I've just touched that under the wax and then lightly created a noodle, but I'm not... I didn't wrap it real tight, I don't wanna completely contain because inside that bubble, you want those fibers nice and loose, so that they'll catch air bubbles, which will imitate that mirrored look that these bugs get when they're merging, when the air... The gas that's created gets trapped inside that shuck that's being shed. Now you can see I'm about a little over two.
I links back from the eye of a hook, that's where I stopped, and I brought my thread back to the eye 'cause I want a little thread base to really lock this shuck down once I get it in place and we'll pull it around. Oh, it's snug, and you can grab the two pieces of andtron front of the eye and kinda pinch it, and then just push that back and then very lightly loop over that, and I'm using my thumbnail on my finger tip to keep the thread from shifting forward 'cause I want these wraps, just rite in front of the under-body on this fly, now I can just kind of take this with just those two kind of loose wraps and make sure that that Antron distributed... I'm gonna turn this up here so I can look at the bottom side, make sure it's distributed all the way around the hook Shank, and I like that nice bubble, that's a really good bubble for this, you can make it too big. And it's much easier to make it too small because you want it big enough, again, like I said, to catch air, once you've treated this with some good floating to catch air inside the shock to help the Antton imitate that ease that they get when they're emerging.
Right now, I'm gonna lock that down really, really good, and then pull up that Antron clip it as close as I can to the hook shank, I wanna make sure that I don't have anything up here further, the back of than the eye of the hook, and then wrap up that those... But now I've got my under body and are shuck and for the wing, like a nice dark deer hair, and I'm just gonna pull off... This is a fairly fine deer hair, it's not gonna flare a whole lot, but I is gonna give me a little bit of flare. Put that off of that. You can see how much I've got. Put that off the skin, I'm gonna clean this out real quick, I usually end up clipping a little bit more than I'm gonna need, that allows me to look at what I've got and then decide exactly how much I want, and I know this just from trying... So many of them, you just get to where you can feel it, and I'm gonna take this, put it in my handy-dandy stacker... I won't set. I'm using this a Loon stacker, or I really like it because it's got that window in the front and you can look down in there and see if your tips or even...
And when you get everything even, do you just flip it up and you've got a really nice long length you can grip. Whoop, you know what, I got ahead of myself, 'cause we didn't... I didn't pick out the shuck... Let's, before I get that on there. Alright, I've got my bodkin, I'm just gonna come up here and I'm gonna pick these fiber from the top, because we don't really need them up on the top of that, that's gonna be covered up, and I don't want a whole lot. I've got like eight or 10 fibers are, and that's it, and that's gonna be enough to catch a whole lot of light and imitate the shuck on that fly, and by picking it out, I've already set my length when I cut it... So the length that I pick out, I already know what length that's gonna be once, pick it out. Alright, back to the wing stack this is never as easy the second time, get the... Alright, now, now the tips, I want them to be just a hair longer than the bend of the hook, so I've got that set right back there, and I'm gonna take that, transfer it to my left hand and pinch that down real time and then make a loose wrap, and then as I come back around, applying the pressure by pulling up, and what that does is it keeps you from pulling the hair around the hook, if you start and apply pressure as you go around on the first wrap, it's just automatically the tension of the thread is gonna try to roll that hair onto the other side of the hook, but by pulling upward, the tension is even all the way around and it just sucks it down in place.
Now, once I get it locked down with two or three wraps, I'm just gonna come through it right through the hair and make those wraps and that locks it down even more, and your wing is right up on top, I wouldn't let go of that way till I've trimmed it, but I wanted you to see what was going on. So brush that out of the way, clip that off, get it out of the way of the eye of the hook, unlike the elk hair caddis, we're not building a big hand with the deer hair, we're gonna build our head with a dubbing in a minute, and it's gonna also add to the illusion of the emerging shock, I've got that in place now. I'm gonna come back a little bit, and I'm gonna tell you that I've got that tied just a little bit of forward a little more than I actually like it, but we're gonna use the head to kind of camouflage that. Then you can see it's kind of buggy, I've got some of the under-body sticking out through the shuck, and that's good, 'cause that'll imatate legs and it's just another trigger on the fly.
Now for the head, I'm gonna use the touch dub technique again, or you just put a little wax on your trend, and then I got my hair mask that I've tried and put in this little empty our whole hook, I'm gonna pull those fibers out and I just want a little bit, not too much. At a time, I'm just gonna lay them flat over that, I'm not gonna spend them at all, just lay it on to the thread on the wax now to hold this hair, I'm gonna put my fingers on either side of the thread, on my side and just kinda get that back on the hook, I'm just kind of fold it over and then it comes around like that once you get it started, it works fairly well. It kinda holds itself in place. Work my way towards the eye of the hook and kinda write up behind the eye in the book, and then slide this back and let back contain all of it and build a head. And then we whip finish shop the head of fly, then I've taken just all of that extra here's mask off of there, and then you can see there's not a lot left, but the head of the fly covered up and it's a super buggy-looking fly to treat this with some good liquid floatant.
I like to use the Loon Locsa, it's just a personal preference. Treat it really good before you fish it, if you wanna fish it under the surface, you can put a little split shot out in front of it or just don't treat it and squeeze it wet before you put it in the water and it'll fish just a few inches under the surface. So this is extremely versatile fly, this is my color that I've had a lot of luck on just across the country with that burnt orange and green, bright green body, so give that a try and fish it through any caddis hatches that you see, especially if they're not taking the surface is the adults, I think it'll do good for.
- East Rosebud Fly and Tackle


Comments 0