
Tying a Chris Mihulka Bass Fly

Tying a Chris Mihulka Bass Fly with Thread Shredder Dave Jennings
Materials for Tying Mihulka Bass Fly
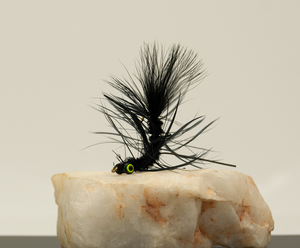
Hi everyone, Dave here with East Rosebud Fly and Tackle, welcome. Today I'm going to tie for you what I think is a tremendously innovative fly. I have to give credit to Mr. Mihulka from Oregon. He developed this fly to fish for smallmouth bass primarily. It's also a pretty decent carp fly. But what really intrigues me about this fly is his use of a hook that you really don't think of for anything but maybe a steel worm.
And this is the old classic Mustad, I'll get my hands out the way, the English Bait hook. That's what this fly is developed on. I just think it's just immensely fascinating opportunities, some potentials here, and do it in different color, in orange, and a couple of pheasant feathers or claws, and you've got a crawdad pattern, and of course, the way this is designed with the dumbbell eyes it just sinks straight down, and it moves the whole time. It's an easy pattern to tie, just using this size six Mustad, this is the 37160, some double pupil lead eyes. Of course you can also use brass. I'm using a small, I believe. And then for the tail, of course, just your blood quill marabou for the legs, excuse me, for the body, some just regular Rayon Chenille, this is the medium size for that hook. Legs are just a black Sili Leg, crazy legs, whatever you wanna use, and then for the actual soft hackle, I'm gonna be using some black Schlappen. I've got a lot of hook to cover there and a typical hen back just won't do the job.
Watch Here on East Rosebud Fly and Tackle
Let's Start Tying
Set up your materials and tie along with Dave
So it's a quick tie, it's a very interesting fly. I know I'm looking forward to giving it a try. Okay, now like I said, we're going to use this Mustad 37160 hook. Size six is the largest that they still make this hook, but that's alright. This will hold a very big fish. I'm gonna put the hook starting in a normal orientation. And I'm just gonna lay enough of a thread base here to get these double pupil lead eyes in. We have a tremendous selection of these double pupil led and double pupil brass eyes. So, I'm just following Chris's pattern here...
This is a size small, which I like for this hook size.
I'm gonna leave a little bit of room there for the eye, and I think it settles a little better when it's not right up against the eye.
That tight to make sure that we've got that fairly square, a little bit of Zap-A-Gap.
Okay, while that's drying, I'm going to reposition the hook so we can tie in the tail, reposition this, like so. And go ahead and continue laying my thread base. And by the way, this is some six-aught black Veevus. Again, any black thread would work fine on this. And then black blood quill. I'm gonna go ahead and strip off most of this. We need a piece that's about... I'm tying them above body length. It gets enough to have some movement without getting wrapped around the actual hook itself.
Like that. With a pinch wrap, make sure we get this tied in, and then trim off the excess. Get those butts tied down, and then I'll move the hook back to its regular orientation to finish this up. Okay, for the body, I'm using some medium size, just plain Black Rayon Chenille. I like to stretch the Chenille before I use it, not quite that hard. This will take about five inches to wrap this. We'll tie it in behind the eyes. I don't like that.
It's in on top of the hook as you wrap it back, and we're gonna go all the way back to the base of the tail.
Okay. Now, for our soft hackle, I'm just going to use some black Schlappen. The length is really not all that critical. We're using it for the movement. Take care of some of this base feather. It's just long enough to do the job for this hook. I'm just going to use a tip tie in. Right here. Right mid-shake here. Then I've got some black silicone type of legs, crazy legs, whatever you wanna call them. I'm just going to put a piece on each side, about the middle, a couple of wraps there, and the same on my side. We'll trim these up as a final step. But actually, when you're wrapping things around legs, I find it much easier if the legs are left long instead of trimming them now. If you trim them now, they're difficult to get out of the way. Bring your thread forward behind the dumbbells, now I'm just going to sweep these legs forward, you could also use something like a bread twist tie to temporarily hold those out of the way and wrap our body with this Chenille.
And a wrap, make sure we have our legs situated here, wrap in the middle, and sweep our legs back out of the way, and continue wrapping. Okay.
And lastly, we take our Schlappen... Make a few wraps. So this provides extra movement for the fly. And as I harp to all of my fly tying students, your flies must look alive. That's the first thing that the fish decide upon whether they're going to eat something or not is, "Is it alive?" I'm gonna get my legs out of the way here.
Okay... Then I'm going to bring the thread underneath the dumbbell eyes back to behind the eye of the hook. I always like to tie off on the hook wire itself... And of course, you can have some head cement there if you like, Zap-A-Gap, whatever your favorite is. Chris recommends trimming the soft hackle slightly away from the eyes. I don't personally know if that's gonna make a lot of difference. I'm going to trim the legs about body length, like so.
And he calls this Mr. Right, because after many, many trials and lots of experimentation, he finally decided this was the right fly. So I think it's an interesting tie, I think it has huge opportunities, a lot of potential here, so give it a try. Thanks for joining in, we'll see you next time.
- East Rosebud Fly and Tackle

Comments 0