
Tying a Balanced Leech

Learn to Tie a Balanced Leech with Thread Shredder John Wood
Materials for Tying a Balanced Leech
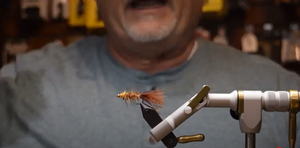
Hey, this is John Wood, and I am coming to you from East Rosebud Fly and Tackle in Billings, Montana. In this video I'm gonna tie for you fly known as the balanced Leach, and this is a version that was taught to me by a good friend of mine from Colorado, Justin Brenner. Now, the balance Leech was actually originated by Jerry McBride of Spokane, Washington around 2005. And it's a great fly, and if anybody that's fish with me can tell you that I am not a big fly fisherman, I like small flies, I like things that are easy to cast, dry flies, small nymphs, this thing here kinda cast like a cowboy hat, but it's worth the effort, when fished the way it's intended to be, it's fish to under an indicator, and that's one of the reason that makes it so hard to cast. And we'll talk about that as we go along. I wanna show you the materials we're using, we're gonna be tying this on the... I get that nowhere. You can see the numbers, the U555 Jig hook in size 12, the threat I'm using for this brand, and one version is the rusty Brown Uni 6/0, and you can see it's a burnt orange color as opposed to UTC Rusty Brown, which is more actually brown.
Watch Here on East Rosebud Fly and Tackle
Let's Start Tying
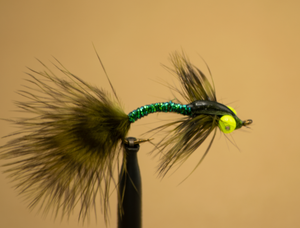
Balanced Leech
Hook: Umpqua U555 Jig, size 12.
Thread: Rusty brown, 6/0 Uni Thread.
Pin: Hareline Balanced Fly Pin or sewing pin.
Beads: Two copper. one 2.8mm tungsten, one 3.2mm brass.
Tail: Brown marabou barbs.
Rib: Small copper wire.
Body: Root beer, Medium Cactus Chenille.
Hackle: Dark ginger or brown rooster neck hackle.
Collar: Orange Ice Dub
Set up your materials and tie along with the John.
To put the beads out front of the hook eye, we're gonna use a straight pin, you can use these specialty pins, or this may be the one case where it's okay to raid the household sewing kit and wrap some pins from your wife. The beads will be, I like to put the point bead is a little bit smaller, a tungsten out front, 'cause that's where you want most of the weight to create the balance, and then I use a brass bed for the bigger one, which is the second one, and this is a 1/8 or... What is that? 3.2 millimeter and the front one is a 2.8 millimeter, then the tail is gonna be just brown Marabou, we're gonna use a small tuff, you can see it's not real thick, it's just a little bit, the body itself is medium cactus chenille in root beer, the wire rib will be a small copper, the hackle I'm gonna use a dark ginger neck hackle, and then the collar up front, which creates a lot of flash is orange ice dub. So let's get cracking. Alright, so we're gonna start with putting this hook in vice, and I'm gonna go ahead and trim my pin and get the beads loaded up, these pins come a little bit long, just so you'll know, having a hard time picking that one it up...
This is actually a sewing pin, like I said, this is the one time when it may be okay to rate your wife's so and kit, so I'm gonna make this the link of the shank, 'cause I want it to be... Fall right in through here. Around the point, once I've got the beads on, but I don't want it so short, but I have trouble getting it to load onto the hook and be secured. So this is gonna be a little tricky. It's gonna be about right there. So that's the length I'm looking for. If it's a little longer, that's okay too, which that's pre-loaded on it is a tad longer, actually a little bit long for me, let's get our thread started... Get going. Now I'm gonna start the thread right at that bend and go all the way back to the hook bend, and you can see that's kind of a rough surface, I don't want that thread base really super smooth because the regret is the better it will hold that pin I found... Bring my thread up there, let it rest. Now, for positioning, I want all the weight of these beads in front of the front of the eye of the hook, and that's what's gonna help it balance in the water, you put that on an open loop under an indicator and just kind of let it hang and it will...
There's any wave action or anything like that it will Bob... And that tail is gonna kind of wag in the water column and it acts like an attractor. So to be honest, this is kind of a suspended Wooly bugger, especially this version. So we're gonna tie this just like we would a wooly bugger, I'm gonna take a bunch of these barbs off of my marabou quill, I want the tail to be pretty fluffy near the end, so I'm gonna come back here and I'm gonna pinch off the tips of those and then measure this and I want the length to be from the head of the pin to the back of the end of the hook, but it's not critical, it doesn't have to be exact, but I'd like to have it fairly close. Now, as I wrap this thing, one thing I forgot to mention as I did, it was avoiding the end of that cut pin unless you de-bur it, 'cause it will chop your thread, and you notice now that I put the marabou butts over the end of that pin and that'll help keep it from cutting my thread as I wrap over that section of the fly.
Now, I like to put my wire on a bobbin 'cause especially for Wooly buggers and stuff, it gives you a little bit better control when you're handling the wire, so I've got my Bobbins over here and I'm just gonna let it hang back off the side of the fly, put our cactus chenille on here. Right at the back, I'm not creating a lot of bulk, and again, we're gonna let that hang, now I'm gonna come up here and I'm gonna attach my hackle in the front, as I said, it's just like we would with the wooly bugger, and this is an old cape I've been working on for a while, pick a feather off of there, and I don't want it to be... I don't want a giant handle like you would on a wooly bugger where you wanna move a lot of water when you're stripping it, this is just gonna hang, so I want this to be just about the size it would be on a dry fly for a number. 12, I'm gonna take that and catch it right here, just by going around that way, and I want you to notice right here that I've got a gap between where a tied in and where the hackle barbs starts.
The reason for that is this cactus chenille got a lot bulk to it, and when you start wrapping it causes those hackles to go in a weird direction, so we've got a couple of wraps coming around this way, now I'm gonna pull that back... Make a wrap here, and I'm going between the eye and the STEM, and that's gonna hold that hackle straight up, and then I'm gonna go in front again and then back behind, and then to secure that completely, I am looping the stem back over the shank. Now, when I start wrapping that, there is a new way, that thing is gonna break in, grab my hand pliers real quick. Alright, now, wrapped the body, very simple, just put it on there and spinning around this cactus chenille forms a nice sparkly under-body, I come up here, I wanna get right up next to the hackle and then I'm gonna cross to the front section behind the feather instead of front or in front of the feather instead of behind, 'cause if I do it behind, it causes that further to kink and then I have trouble getting it to lay out the way I want, and I'm just gonna kinda off right there.
Right behind the beads. Now, some people make a big thread bump back there, but I don't find that necessary because of the amount of bulk that we're gonna buy right there to wrap that around, I wanna get one full turn right there before I start going back and then just kind of spiraling or Palmer all the way back to where everything is tied of in the back. Now, here's a part where you can cause yourself to start over, I am gonna hold that hackle straight up, and the reason for that is, when I pull this wire around, it'll pop it, if I don't have it late against the back side of the hook, Shank and likewise, I'm not gonna go straight up with my wire, I'm gonna pull it forward and then come up like that without putting any pressure on the tip of that hackle until I've got the wire all the way around, then I can just pop it loose. If you break that, then you're gonna end up having to re-wrap that and it's not fun, 'cause you've gotta start over now to get this through the hackle, I'm just gonna kinda give this a wiggle.
And again, like I said, I like to use this on a bobbin because it just gives me a lot more control. And wiggle that back and forth through those stiff tackles, and it keeps from trapping as many as it would if I just tried to wrap it straight in, then once I get here, I'm gonna come up here right behind the beads and make one full wrap of wire, then I'm gonna go in front of the wire with my thread and then I'm gonna repeat this next process three times, once behind, once in front, one behind. Once in front, one behind, once in front, now that's locked that thread down, I mean that wire down completely. So all I've gotta do is helicopter and it'll pop right off. Without any problems for the collar, I'm gonna put a pre-bulky amount of this orange ice dub, 'cause I wanna really fill that up and make a nice full collar out of it, and we just take it and just shove it right into that gap and catch loose parts of it, and then I'm gonna stroke it back once I've got it on wrap and then do my whip finish is right behind that bead.
You don't need much for whip finish because as I step will grab that thread and it really locks everything down in place, it's very solid. Now, you can fish the several ways, the two best ways to fish it, or if you wanna strip a deep leech, just tie it on an open loop and strip it through the water, column and the other in the most popular way, the way it was designed as I put it under an indicator, and as I said, it kinda cast like a cowboy hat, but it's worth it because I have yet to go to a lake that I didn't catch trout. This just catches trout everywhere, and this particular color version seems to be really, really good across the country, but for casting what you wanna do rather than just trying to pick it up like you would if you had a couple of small nymphs and cast what you've gotta do is slide that indicator across the surface and that'll pull fly up closer to the surface, and once you've got that fly up out of the water column, then you can do your back cast with a lot of power and then start casting...
It is just getting it going, but once you get it going, it can fairly well, for a cowboy hat, give it try... You'll like it.
- East Rosebud Fly and Tackle

Comments 0