
Tying a Redfish Gonga

Learn to Tie a Redfish Gonga with Thread Shredder John Wood
Materials for Tying a Redfish Gonga
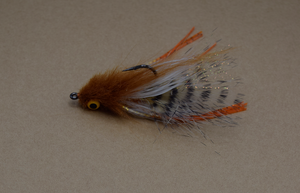
Everybody, this is John Wood, and I am coming to you again from East Rosebud fly and tackle in Billings, Montana. Today, I wanna do for you, this is a modified fly from Charlie Craven, this is a modification of his Gonga, and I got a call a while back from a fellow who wanted some gangs, but he was taking them to the coast of Texas, and he wanted to fish for red fish. Well, ravens Gonga writes her point down, and since red fish are bottom feeders, that kinda creates a lot of problems, especially when you're around weeds and things, so I have modified this so it will fish point up and instead of putting the eyes in the hook up, I'm putting them on the bottom. And what we're gonna use is, I like the tides on these series hooks, this one is the 420 in a size 1 and the eyes, we're gonna use our painted ladies size medium. I wanna get that down fast, the tail is this mini bar bugger, boo TA bar black, and then we're gonna have a little Crystal Flash in the tail Root Beer, and it will be wrapped with white shopping, the body is a medium tactical, it's got a little bit shorter fibers than the standard, and this is gonna be in Root Beer also, and then these bare legs in sand and Orange, we're gonna use four of those, and then the head is gonna be built with pseudo hair.
Watch Here on East Rosebud Fly and Tackle
Let's Start Tying
Set up your materials and tie along with John
Now, one thing I wanna point out about the pseudo-hair is when you purchase your fur or doing this, make sure you get the fur that's got the super fine tips on it, some of the fur is sold from different suppliers has wide flat tips, and that's not gonna quite work, it will work for this that we put over the top, but when it comes to spinning the head, it just doesn't work out right. Alright, so let's get started on this red fish Gonga fly, which is a modified version of Charlie Cravens gonga. And I'm gonna put my hook and it's like we said, this is X series, excess 420 and the Vice, I want a point down, and the thread I'm gonna use on this particular one is a uni thread, 6/0 in Rusty Brown. Now, to set my eyes, I'm gonna come back. About one hook eye width behind the eye and build a big thread bump. I'm gonna use this thread bump to position my eyes, and this is gonna keep me from letting those eyes slide too far forward, once I get my thread bump built, drop the straight in front of the Bump, gonna take my eyes, make one loop over the center of the eye and drop it behind that thread, bump another loop, and then I'm gonna twist the eyes a little bit and make a few loops the other direction, and what I'm doing is I'm going at a 45 from one side to the other between the eyes, trying to get those positioned in the center...
There we go. Now, I'm just gonna make several wraps one direction, and then several wraps the other direction, make sure they're straight and level, and then I'm gonna make wraps between the hook shank and the bottom of the eyes, make several wraps There, and Then Repeat this procedure of making the 45 degree or wraps, one direction and then the other, and then loop again between the eyes and the hook Shank. What that's doing is it's collecting all of those thread wraps and snugging them up to the point to where I cannot move those eyes, even if I wanted to... You can see it, it's moving the hook Shank until it did spin. Now, I'm gonna have to do that again. Here we go, got a little too rough with it. Alright, so those are nice and tight right where I want em. And I'm gonna come back to just slightly beyond the bend of the hook, which if you let your thread drop, that's gonna be right at the front of where the bar is on this particular hood. Now we're gonna take this Barredd mini Marabou used for our tail, and I want it to be a little bit longer than the entire hook I havpe at a quarter of a inch, grab that between my left finger and thumb, sintch it in place, and I'm gonna pull my thread up here, and this is something that I wanna point out is we need to leave a gap between the dumb bell eyes and where we stop the body, so that we've got room to build the head and...
Set that wing on top. So I bring my thread forward, and the reason I do that before I pull my marabou down is to make sure I'm in the right spot, and then I can just lock this Marabou down really good, exactly where it needs to be, trim it. And then get it secured in place, now again, I'm gonna stop a little bit short of where my tail tie-in point is with my thread, so that I can set my Crystal Flash and the angle that I want it, because this fly is gonna be riding on the bottom, I want this Crystal Flash, which is about four strands to kind of stick up off the bottom a little bit so the fish get a little bit better visibility of it, and to do that... Sorry, one of those short... Let me grab another one. Okay, I need this all to be full length, I actually got five, which is fine, I just don't wanna get carried away and put 10 or 12 of them in there, so let's do this the right way. I'm gonna fold that in half, even up the ends, put that around and cut it in the middle, that's gonna give me almost exact link that I'm looking for.
Now, you're not gonna be able to see this as I do it, but I'll explain it to you. I want those Crystal Flash pointing down below the marabou, and I wanted about the link to tail, and I'm gonna clamp it over here, and it's sitting at an angle with the loose ends up near the top of the hook, Shank, lock that in and holding it in place wrap back to where I was and when I let go, that flash is actually on top of the... Marabou bring my thread back forward, fold this over here, and then this side, you can see what's going on a little better, I'm gonna hold that really tight in place, walk it down there, and that... Crystal Flash is right where I want it. Quickly, I'm gonna flip this over and trim that second bunch, 'cause they're just a little bit long. Okay, now for a body, you're gonna put this medium cactus chenille in Wait a minute, first, let's put our schlappen in 'cause that's what we're gonna palmer it with. Now, I'm gonna take, even though we're not using that portion, I'm gonna go ahead and get that fluff off of the base, 'cause it just gets in the way, it makes things a little trickier to operate, and then grab it by the tip and groom those fibers back.
Like any other feather, this feather has got a cup to it, it cups downward, this is the top side of the feather, and that's the bottom, I want that cup downward when I tie it in, bring that right back there, close to that and I wanna catch in not only the STEM, but a few of the barbs of the hackle, and that's just gonna make that tie in point just a little bit stronger, wrap it forward, clip that tip, bring this is up for a little bit. And then now we're gonna put in the medium cactus chenille, I wanna make sure I get quite a bit of that so that it's very secure, and then I'm gonna come right back up here to our tie-off point where we ended our marabou. Notice we've still got a gap right there, take that chenille and just kinda wrap it on there and brush it back and they go, so it's nice and full. Once you get that rhythm going, it just kinda works or we will till you Drop it like that, and I want it fairly thick, right up to the point where we had tied in the butt of our, tie that in clip it with a little extra line so that we've got something to really lock it in it, now I'm gonna take my schlappen and then we're gonna Palmer that forward, as you do you wanna brush the barbs backwards.
Alright. And just kinda... No, gotta get that up on top of that chenille so that it will stay in place. There we go. I'm gonna try to make about six, seven, maybe even eight wraps here, and just keep that stuff back, keep all your barbs going back as we go around, I want it to be fairly thick, but you can see that that cactus chenille still showing through there as an under body. Again, I'm gonna bring that right up to that same tie-off point to get up there and strip those out of the way so they don't get in my way, and then walk that down. And again, I'm gonna trim this so I've got a little bit of a stub, I can brush the bar back with my left hand and then catch that stub and make sure it is completely secured, and then I'm building a little tapper right here in that gap. You can see that pretty well, I hope. Now I'm gonna go upside down and we're gonna put the legs on, and these are the bi-colored, this is orange and sand, and just get some glitter in there, and I want four legs to click them off on and off of the other by the end.
My thread right behind the eyes, pop him over the thread, even up the ends and then just kinda pull it upward and lock that down now, holding tension on the thread, I'm gonna pull that half of those legs over to one side and lock them down. At would be about the 10 O'clock position on one side, and then use the other group and go to about the 2 o'clock position, and that kinda keeps them from being on the bottom side, but they're gonna be in a good position for coming out on the head and so they're not in the way while I'm spinning the head, I wanna take these and put them in my handy-dandy material holder, just come and walk them down in here a little bit, if I can get that to work. Come on, Spring. There we go. All them back. Now, I don't have to worry about is getting in the way, dampen that and push it back. Now for the wing, I'm gonna take some of this pseudo hair and I'm gonna use my scissors to kind of pull some up... Separate it from the rest of it. You see, I've got about two inches of her there, that's maybe a quarter into wider more, and I'm just gonna clip it as close as I can, write down on that cloth backing.
Now, I wanna take this and using a brush, this is a eye Brow, any kind of brush. Well, do I wanna get all the short fibers right out of the base, I just want the longer stuff...
You can see what I've got there, I've got of a little point, and I want this about the same lenght as the entire body, just gonna transfer that to the other hand and tie it right there and wrap right back to where everything else is tied in. Secure it forward, and then I'm going to clip the butt portion off and save it, and we're gonna use that for part of the head, now I wanna brush these, separate it on either side of the hook and just kinda pull that back down tightly against the schlappen and get it out of the way. And we're gonna build a dubbing loop. Now, I tie this, I do just say about four and a half insist what I've worked out for this size fly in, make a couple of rounds around there, drop my bobbin and over the two threads over here so that they'll come together right at the fly and then bring everything up here, and that's long enough that I can let my dubbing twister rest and I'm gonna take one more clump of the pseudo hair, about the same as what I had before I. Cut it off right at the fabric backing, and we're gonna do the same thing, I'm gonna grab it up here, about half an inch from the butts and then brush out all the really short fibers, it's gonna take some of the bulk out...
Those fibers would be too short to be of any use to us in the head anyway. So you see what I've got. Now, I'm gonna cut this at one-third at the butt and two-thirds at the tip, and we're gonna use these in our dubbing loop gonna start with the longer pieces from the tips, we'll get some dubbing lack on here, you wanna kind of liberally Coat this, make sure everything's gonna stick. No blobs, but you definitely want it really well, waxed the blobs off of there. Now again, no, take these tips, and I wanna stick the butt through there, it's just easier to handle them that way because the but are a little bit stiffer, opening this up with my fingers on my left hand, slide that up there to you, bump right up to the eyes don't go past that, because when you start spinning, you won't be able to get that hair to spin where it's behind the eyes in the dubbing loop. Now I'm gonna take the portion that I trimmed off from the wing, open it up, and again, open the dubbing loop, slide that in there, kind of tap it down in place, and I'll show you what this doing looks like.
Before we start spinning that, and then this last little bunch work that in there... There we go. Now, what that's done is it's kind of created a slight taper, I've got my longest hair right up here 'cause I wanna create a bit of a shroud. Now I can just spin that. And I don't wanna put too much pressure on that as I'm spinning it, because if you pull it too tight, you don't get as much spin up here, you want it snug but not super tight, so that you do get spin near the fly. Otherwise, all your spin, if you pull that too tight, I've found you end up with more spend here than you do near the fly, so you can see it starting to... Kinda came up a little bit in the center. That's where I want, I don't wanna over do it. 'cause you break that thread, it's not that strong, and now I'm gonna take my brush again and I'm just gonna kinda lightly brush that out, you wanna be cared for brushing against the threads so that you don't cut it, especially if you're using a metal brush because it will the tips are pretty sharp and will cut that thread, and then you're starting over, and we've got a lot of time in this fly, I don't wanna mess it up now.
Alright, now, with it up like this, We wanna save our thumb and finger, the tendency is to wanna work from the top, but you end up with the thumb that looks like you've just caught a bunch of Pike and tried to lip them, so I'm gonna do this from down underneath for that, and you can see I'm wrapping right at the back of where all that thread base has been built up and do the same thing, and then we wrap it on like a hackle, I'm just gonna go over the next wrap right in front of it, don't let yourself pull it back on to where you're stacking 'cause you'll end up with a big thick walking back into the head, and you won't have enough left for the front... I've got three, this is my fourth wrap right here, and you can see that that ad is in a thick... I'm gonna go one more, and I'm squeezing that right up in behind the eyes, right up in that little dumbbell gap, and then as I come around after that fourth one, I'm gonna pull the fibers back, me get my thread a little better.
And I'm coming around, I keep pulling that back and that's gonna fill that gap between the dumbbells you... I'm not sure you can see how far back that thread is, but it's right back between the dumbbells and just keep doing that until... We've run out of brush. Now, in the beginning, I said I made my loop about four and a half inches, you can see that I'm about a half inch here, and then we had about a quarter inch, so you're using about three and three-quarter inches of dubbing Loop. Now, once I've got the brush all used up, I'm gonna wrap my time thread twice around the diving loop thread and then make a couple of wraps a... Okay, now I've got my dumbing look down on a trim it back here. And how... Before I do my whip finish, make sure I've got all of this fur really back as best I possibly can, and I can see the end of my dubbing loop. And I wanna make sure that I'm grabbing that with my wrap prior to doing the whip finish, I want dubbing loop secured, 'cause I don't want this head coming apart when I'm fishing it.
Here I go. I mean, just put a nice solid whip finish on there, trim it and now we can trim the head... Here's a product, I really like, it's this bucket, this trash bucket, I really love that because I don't have to worry about this stuff going everywhere when I'm doing a trimming like this, now I'm just kinda using my brush to pick that hair out to tease it out and get it all standing straight out from the hook Shank. What I don't wanna do is get this hair that I tied in for the back, caught in that, so make sure you keep that groomed out of the way. Now I start with the back for the bottom of the fly, and I'm gonna cut this way right here, and then that way, right there, you can even pull up on these hairs, get that bottom cut perfectly flat, and this is something that's slightly different from... Charlie's Gonga because that hand is rounded on that one because it's meant to swim through the water, call them at that bottom time flat, and I'm gonna come here to trim in front of my eyes one of the time... Now where everything standing out away from the hook, I'm gonna trim towards the point of the hook, and that's gonna give me the head shape that I want...
You don't wanna get too carried away and trim it flat, 'cause then you're just treating your head off, and then for the sides, you can see you... That's kind of flared out right there, and I don't wanna trim all that off 'cause I wanted to transition to be kind of sudle so I'm kind of lift as a trim that's gonna give it, as you can see, a sudle transition, it's not a sharp edge, but they do the same thing over here... With my brush, brush all the excess off. Now, I'm gonna release my legs and I wanna trim them to where they're just a hair longer and the tail... Now, I'm gonna pull this out of the vise and do one more little trimming from the other direction... Just to kind of contain everything. Again, I'm putting my scissors and cutting from above the point of the hook, so I don't cut that too short, and when we're done, I put my little thing away... Finally, there is Redfish Gonga, a modified version of Charlie Cravens Gonga streamer.
- East Rosebud Fly and Tackle

Comments 0